All photos © Robin and Arlene Karpan
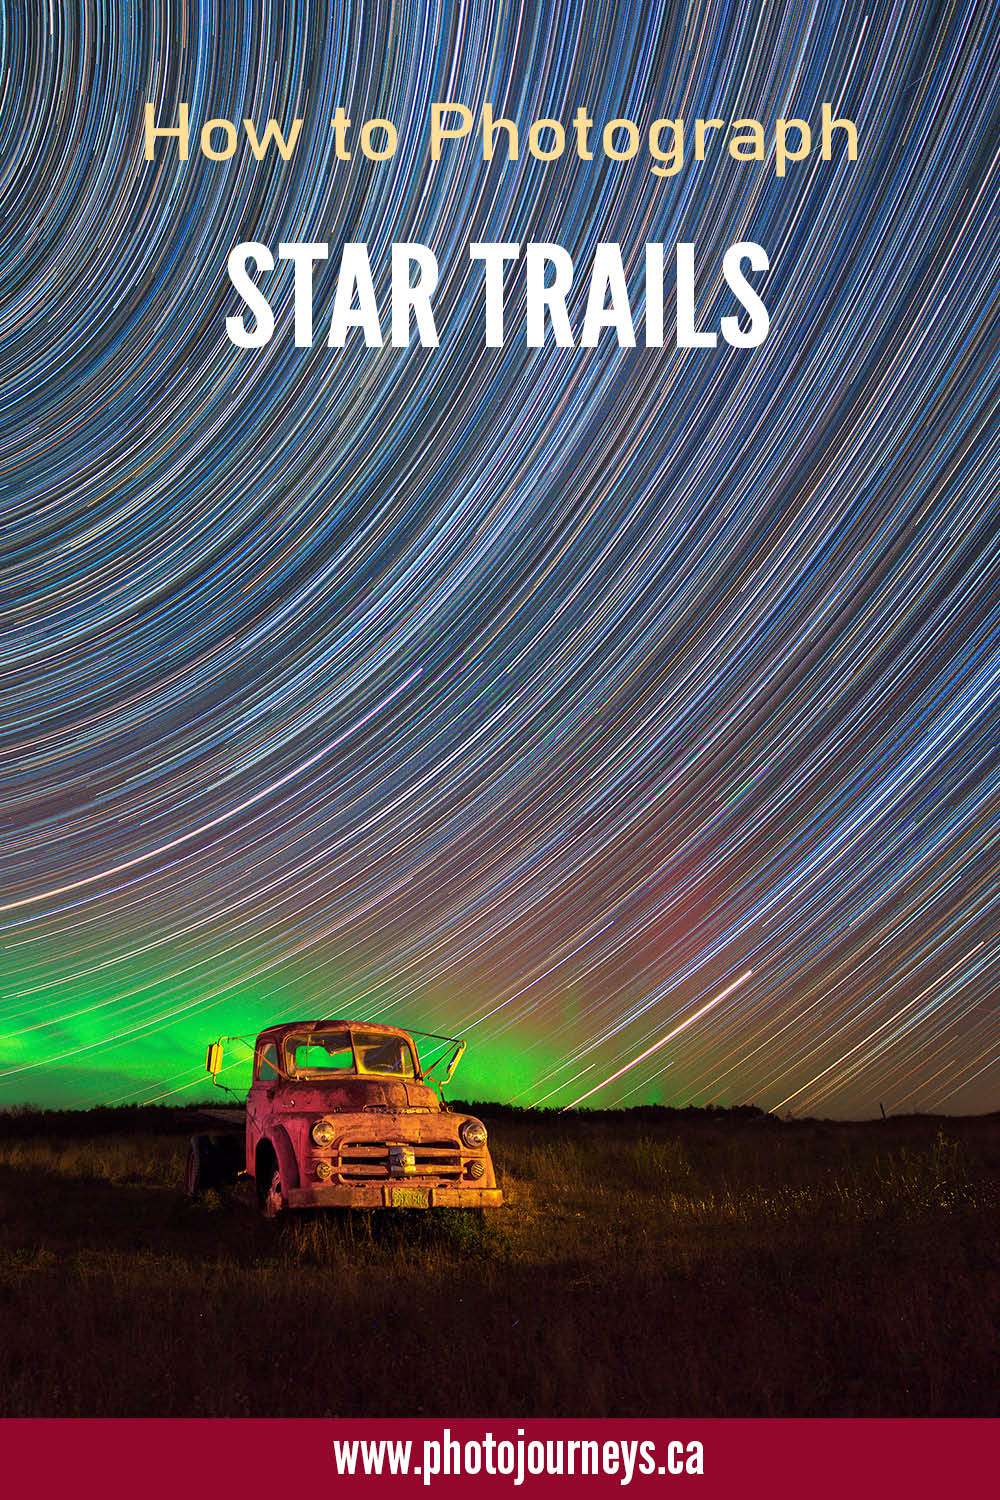
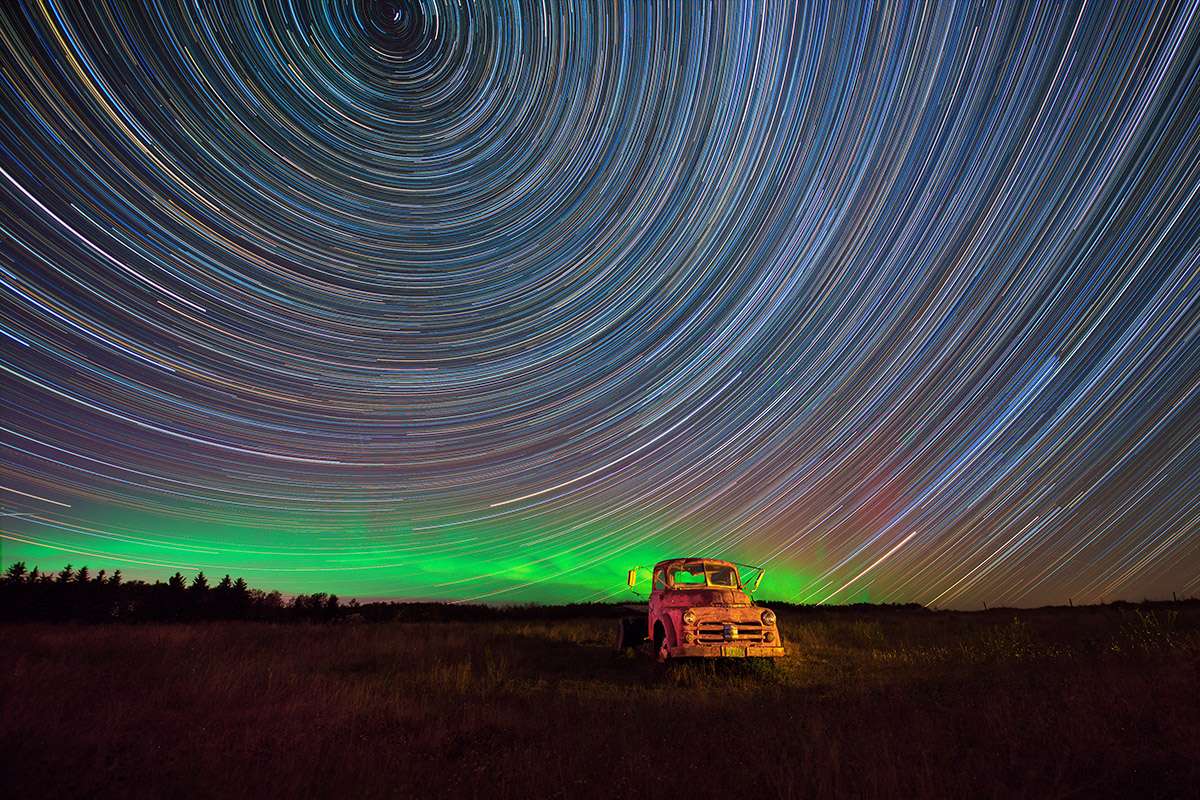
Of all of the photos we can take of the night sky, star trails can yield the most surprising results. It’s a view of reality, though not something we can see at one moment in time. The above photo was taken over a span of about 2.5 hours. As the Earth rotates, the stars become streaks of light – except for Polaris, the North Star, which remains stationary.
The good news is that star trails are fairly easy to take, and with less need for specialized equipment than most other types of night photography. When we want stars to be points of light, as we see them with our eyes, there are more constraints. Because of the rotation of the Earth, the shutter speed has to be short enough so the stars don’t blur, so a full-frame camera with a wide-angle lens capable of wide apertures such as f/2.8 usually works best.
But for star trails, we don’t have to worry about that since we want the stars to be stretched out. So practically any camera and lens combination, along with a tripod, can do the job. However, the wider the focal length of the lens (such as 14mm, 20mm, etc.) and the “faster” the lens (capable of wider aperture settings), the better.
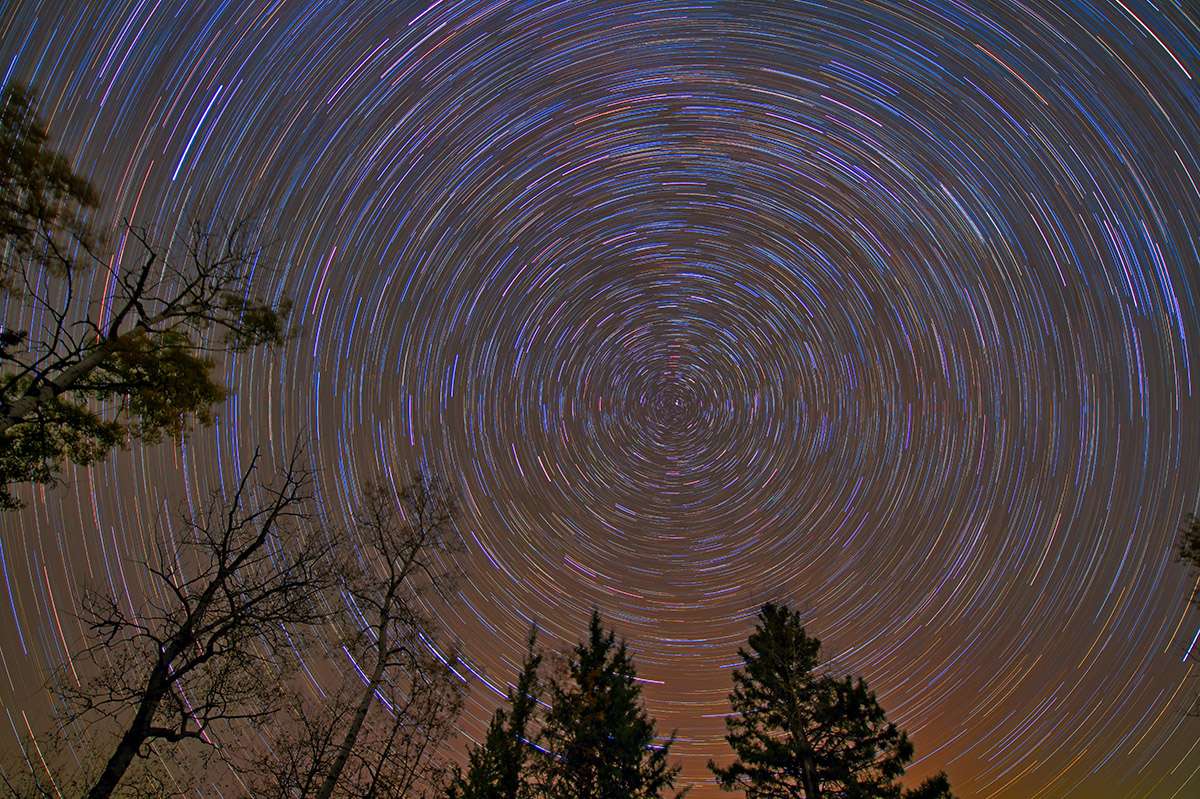
Star trail photography is also very forgiving. There is no exact measurement as to how long the exposure should be. It can be a half-hour, hour, three hours, whatever. In shorter exposures, the stars will look more like a series of short curved lines, whereas longer exposures will appear more like complete circles. The longer the exposure, the more variations of colours of stars we can see.
Take a series of images
Unlike taking star trails on film with one really long exposure, today the normal process is to take a series of shorter exposures then stack them together to produce the final image. The most convenient software that we found to do this is Sequator (which, as a bonus, is also free). It only runs on Windows computers. It is also possible to stack the images in Photoshop and other programs.
To program a series of images you need to use an intervalometer. Many newer cameras have them built in or you can buy external ones fairly inexpensively. You then set it to keep taking 30-second (or any other duration) exposures for however long you want.
Here, too, there is no strict rule as to how long the exposures should be. Many people use 30 seconds, others use as much as 3 minutes, so you have a lot of latitude. Do a few test shots to find the results you like.
The advantage of longer exposures is that there are fewer frames to stack together. However, with shorter exposures, if something happens to one frame, such as a car driving by with bright headlights, you can eliminate that frame with little noticeable difference to the final image. As with most dark sky photography, use the widest angle lens you have and set it at or near the widest aperture setting.
Exactly what settings to use will vary with light conditions, and your camera equipment. Aim for the lowest possible ISO while still getting a bright enough exposure. With a series of shorter exposures it is easier to do a few test shots and adjust the settings until you get the exposure you’re happy with before running the camera for half the night.
Retain the colours of the stars
Stars are not all white but have different colours when we look at them carefully. The key to retaining those colours is being careful not to overexpose the stars. Whenever you see a star trails photo where the stars are all white, it’s often because the stars were over-exposed. When we look at the night sky it isn’t immediately apparent that stars are different colours, but when they become stretched out in star trails the colours become a lot more noticeable.
It’s tempting to expose for the overall scene, but because the stationary stars are quite small in the scene, the camera meter tends to put less importance on them and more importance on the dark areas, often resulting in over-exposed stars. We like to under-expose the scene a bit. Dark areas can usually be brightened when processing the image, but if you blow out the highlights, they are lost forever.
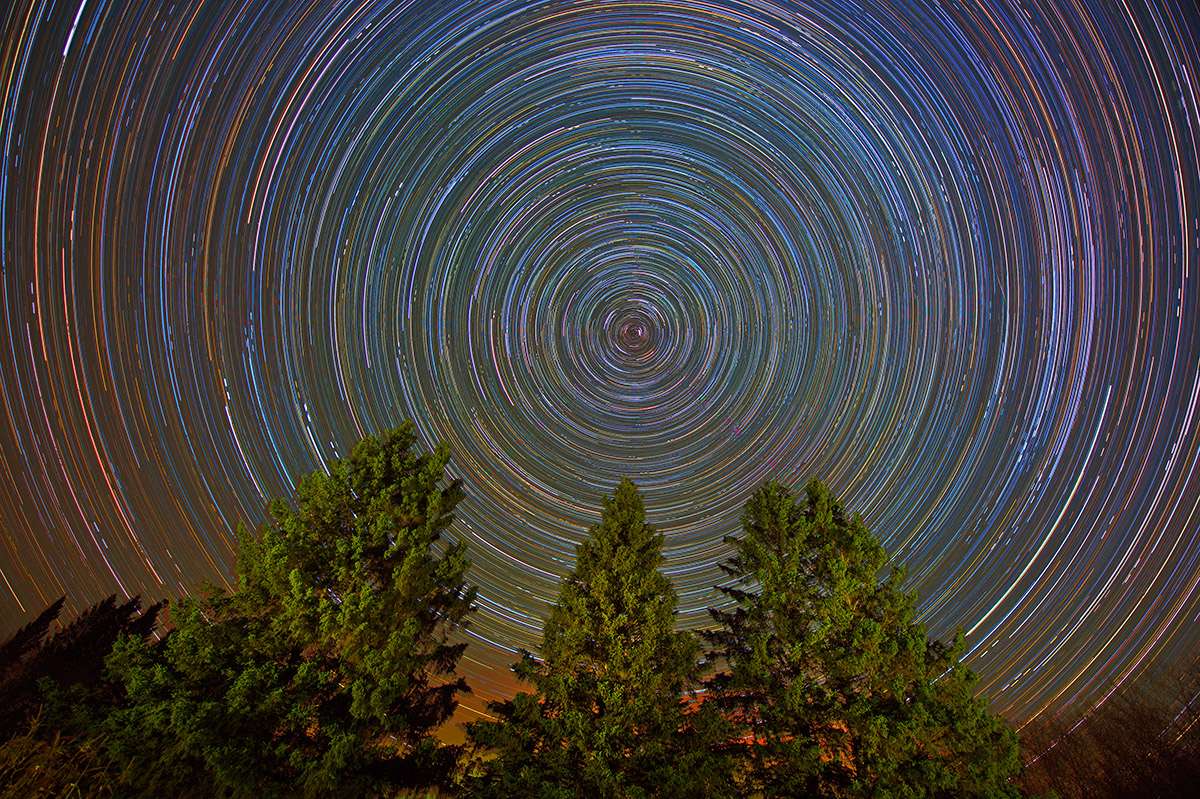
As a general rule, we get more colours in the stars when we take a longer series of photos (2 hours or more), and when can keep the ISO reasonably low. For the above photo, we used an ISO of 400. While this might seem low for a night shot, it helped to keep the stars from being over-exposed and to retain their colours.
Try some light painting
For the truck photo at the beginning, I did some light painting on one of the 30-second exposures. This was simply a matter of shining a light on the truck for a few seconds. The photo above also has some light painting on the tree tops. How much light you need and for how long varies as to the scene. But most photographers trying light painting for the first time are surprised at how little light they need.
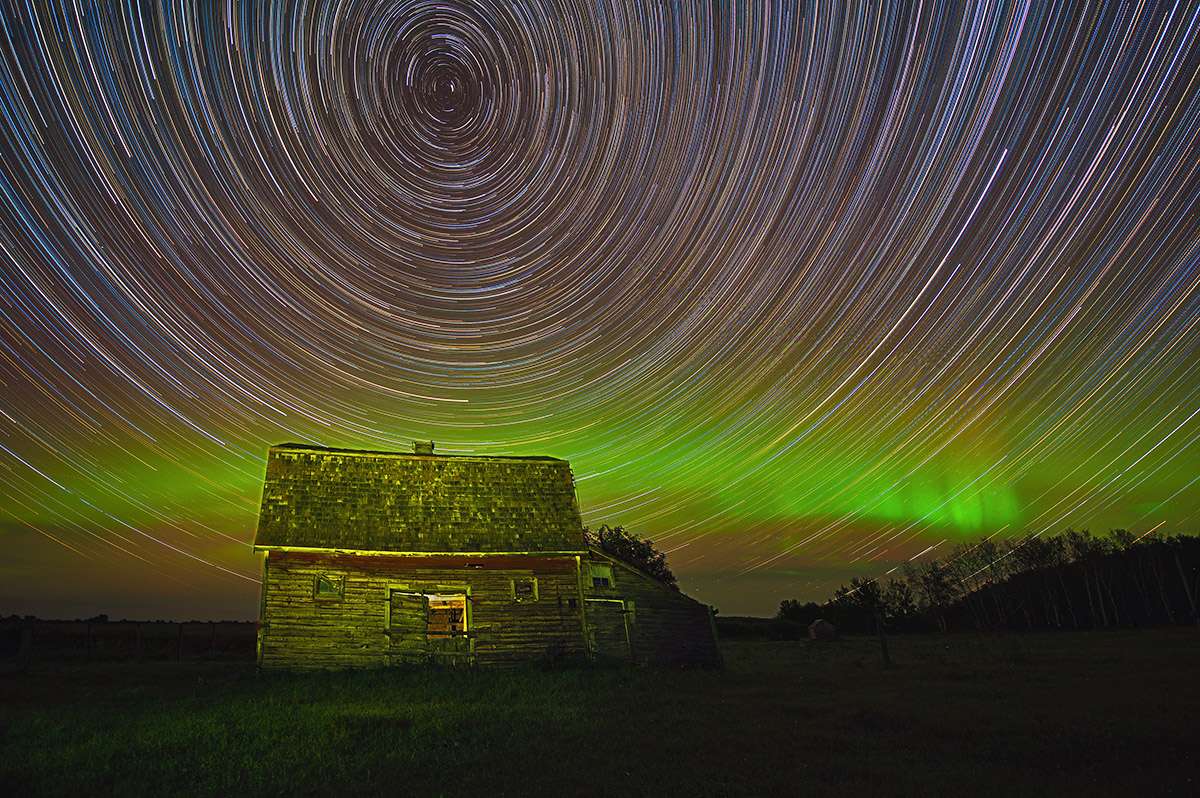
For the photo below of the barn, I did one frame while shining the light on the outside of the barn, then another frame with a very low intensity light inside the barn. The fun part of light painting is that you can experiment with all kinds of variations.
Turn off auto-focus
In most nighttime photography, it is best not to use autofocus. While it works fine in the daytime and when there is sufficient light, autofocus struggles at night and often doesn’t work at all. When using a wide-angle lens for night photography we usually pre-focus the lens at infinity in the daytime, then switch auto-focus off.
Often we’ll tape down the focusing ring on the lens so that it doesn’t accidently move. We suggest using gaffers tape which can then be removed without leaving a sticky residue. Wide-angle lenses have a large depth of field, so leaving the focus on infinity usually isn’t a problem unless you’re extremely close to your foreground subject. However, check that anything you intend to include as foreground is still in focus at infinity. For example, in the star trails image with the truck, the truck is still in focus at infinity even though I was quite close to it.
Other points to consider
• As always, shoot in RAW which gives you the greatest flexibility in processing the image and making adjustments.
• Aiming the camera at the North Star is only one option. Also try other directions which will result in streaks at different angles across the sky.
• If you’re leaving your camera unattended for a long time, make sure that your tripod is extra stable. One option is not to extend it to its full height. If the camera is lower to the ground it will be more stable.
• Above all, experiment and have fun under the night sky.
More Photojourneys posts on photography that you might enjoy
SUBSCRIBE to Photojourneys below
Feel free to PIN this post on How to Photograph Star Trails