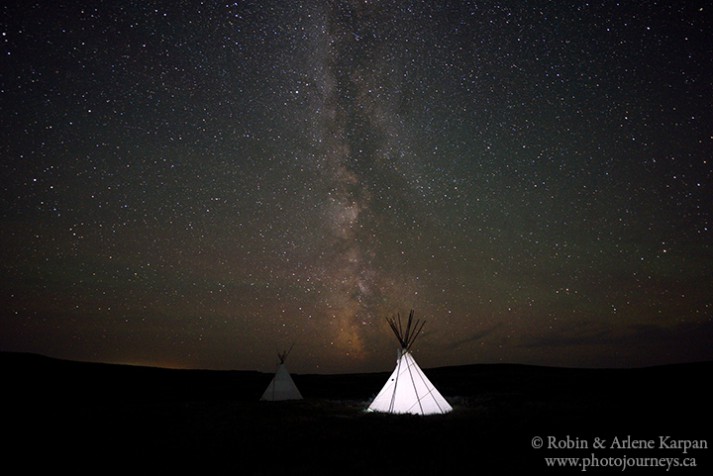

Including the milky way is one of the easiest ways to add drama to your night photos. While milky way photography can get quite sophisticated, for this posting we’ll stick to the basics of getting the shot, using the above photo as an example. We took this image in Grasslands National Park in southern Saskatchewan using a Nikon D810 and Nikon 14-28 f2.8 lens. Settings were 30 seconds, f2.8 and ISO 2000.
The milky way shows up best when the sky is darkest, so the best time of month is the two weeks or so around the new moon, so that moonlight is not competing for attention. Being away from light pollution also helps. Fortunately, Grassland National Park is a Dark Sky Preserve (one of the largest and darkest anywhere in Canada). The two tipis are in the Rock Creek Campground in the East Block of the park, but are a short walk away from the main campground so that lights don’t interfere. It also helped that the campground was behind us when facing south for this photo. Campers can rent these tipis, but fortunately they weren’t being used at the time, so we could prowl around in the middle of the night and try different things without waking anyone up.
We want the stars to appear as points of light, rather than streaks, so the first thing to do is determine the maximum exposure for your lens. A handy gimmick is the “500 rule” – divide 500 by the focal length of your lens, and you get the maximum number of seconds for an exposure so that stars appear as points of light. So if you have a 24mm lens, the maximum exposure length is around 20 seconds. For our 14-28mm lens (set at 14mm), the maximum exposure is around 35 seconds. So the wider the lens you use, the better.
Set the camera on manual focus (and focus on infinity), and on manual exposure (using the maximum exposure determined by the 500 rule). It’s best to shoot with the aperture wide open (f2.8 in this case), so the other main decision is the ISO setting. A fairly high ISO will likely be necessary, so start with 3200 or so, look at the results, and adjust as needed. If your lens isn’t as wide, and or isn’t as fast (less than f2.8 for example), the ISO will likely have to be even higher. We always aim for the lowest possible ISO in order to minimize the amount of noise in the image. You may also want to fine tune the exposure. The 500 rule gives you the maximum exposure, but if you see slight blurring of the stars at the maximum, it might help to decrease the exposure slightly. As in all “rules”, use this as a starting point, take a few shots, then make adjustments until you get the effect you want.
There are several ways to deal with lighting the foreground in milky way or any night time photos. The easiest is to simply expose for the night scene and allow the foreground elements to remain fairly dark. This is the most natural look and worked reasonably well for the tipis. But adding some light brings another dimension. We played around with painting the closest tipi – shining a flashlight on it during part of the exposure. This worked okay, but the effect we liked best (the photo shown here) was illuminating the tipi from the inside. All we did was place a very small LED flashlight inside, pointing up.